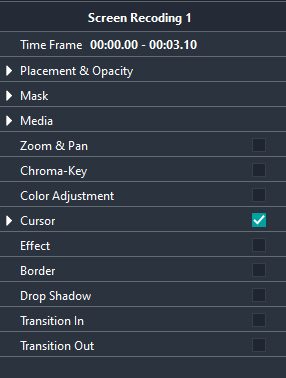
Screen recording properties can be edited by clicking on the screen recording in the Timeline or on the Canvas.
In the Object Inspector, you can rename the object, edit its size, effect, border and so on.
Name The default name for a screen recording is 'Screen Recording X' ('Screen Recording 1', 'Screen Recording 2', and so onward), and this is visible in the name property of the object. You can change an object's name by deleting the default name and typing in another one.
Placement & Opacity
Adjust the size, rotational angle, scale, opacity or manually change the location of the object on the Canvas.
Learn more...
Click the Reset button to reset all values.
Position
Enter X and Y coordinates to specify the location in pixels of your object on the Canvas, based on the center of the object.
Size
Enter Width and Height to specify the size in pixels of your object.
Rotation
Use the rotation option to rotate (in degrees: -180 to180) the object.
Scale
Use the scale option to scale (10% to 200%) the object.
Opacity
Use the slider to set the opacity value or enter it manually (0 to 100%). When set to zero, the object is transparent.
Mask
The mask property allows you to change the shape of the screen recording: Rectangle, Circle, Ellipse, Triangle, Hexagon, Octagon.
Learn more...
Adjust ( Rectangle/Triangle): Use the slider to adjust the roundness of the corners.
Media
Set the scale, opacity of the screen recording.
Learn more...
Scale
Click to scale the screen recording.
Flip
This property allows you to flip the screen recording vertically or horizontally.
Opacity
Use the slider to set the opacity value or enter it manually (0 to 100%). When set to zero, the screen recording is invisible.
Zoom & Pan
This feature allows you to focus your audience's attention on key aspects of your screen recording.
Learn more...
Zoom
Drag the slider to select the zoom percentage or enter it manually (100 to 500%).
Left/Top
Use the sliders to drag the screen recording to the desired location.
Chroma-Key
The Chroma-Key creates transparency using a color.
Learn more...
Color
Click to specify the color to be converted to transparency.
Use the color picker to select a color on the screen
Set Invert to hide everything except the color.
Tolerance
Use the slider to specify how far from the chroma key color is considered transparency.
Color Adjustment
This feature allows adjustment of brightness, contrast, and saturation.
Learn more...
Brightness
Drag the slider to set the brightness or enter it manually (-100 to 100%).
Contrast
Use the slider to set the contrast or enter it manually (-25 to 200%).
Saturation
Use the slider to set the value or enter it manually (0 to 100%).
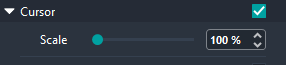
Cursor
Cursor.
Learn more...
Scale
Drag the slider to set the scale or enter it manually (100 to 500%).
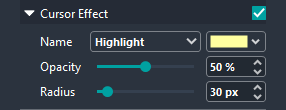
Name
Select Highlight | Magnify | Fisheye Lens from the popup menu to create a visual effect to the cursor.
Color
Click the color field to select the highlight color from the popup menu.
Opacity
Use the slider to set the value or enter it manually (0 to 100%).
Radius
Use the slider to set the radius or enter it manually (0 to 300 pixels).
Name
Select Rings | Ripple from the popup menu to create a visual effect when you left-click the mouse.
Opacity
Use the slider to set the opacity or enter it manually (0 to 100%).
Radius
Use the slider to set the value or enter it manually (0 to 300 pixels).
Thickness
Use the slider to set the value or enter it manually (1 to 10 pixels).
Duration
Use the slider to set the value or enter it manually (100 to 1000 ms).
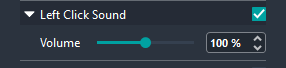
Volume
Use the slider to set the volume value or enter it manually (0 to 200%).
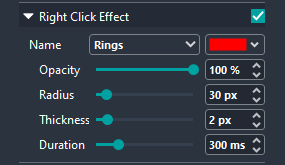
Name
Select Rings | Ripple from the popup menu to create a visual effect when you right click the mouse.
Opacity
Use the slider to set the opacity or enter it manually (0 to 100%).
Radius
Use the slider to set the value or enter it manually (0 to 300 pixels).
Thickness
Use the slider to set the value or enter it manually (1 to 10 pixels).
Duration
Use the slider to set the value or enter it manually (100 to 1000 ms).
Volume
Use the slider to set the volume value or enter it manually (0 to 200%).
Effect
Add an effect to a screen recording: Gaussian Blur, Directional Blur, Radial Blur, Spin Blur, Colorize, Grayscale, Pixelate, Dissolve, Genie, Magnify, Swirl, Fisheye Lens.
Learn more...
Use the slider to set the intensity value or enter it manually (0 to 100%).
Check the Border box to clamp the output to the size of the screen recording.
Border
Add a border.
Learn more...
Brush
Click to choose Solid Color | Linear Gradient | Radial Gradient from the popup menu.
For solid color, click the thumb and select a color from the menu. Right click on the thumb to set the opacity (0 to 100%).
For the gradient, click in the left thumb and select a color, then click in the right thumb and select the second color.
Style
Describes the sequence of dashes and gaps: Solid, Dash, Dot, Dash Dot, Dash Dot Dot.
Describes the shape at the end of a line or segment: Flat, Square, Round, Triangle.
Thickness
The border width (in pixels: 1 to 20).
Offset
In pixels: -50 to 50.
Blur Size
The amount of blur to be applied to the border (in pixels: 0 to 20).
Opacity
Use the slider to set the opacity value or enter it manually (0 to 100%). When set to zero, the border is invisible.
Drop Shadow
Create a shadow effect.
Learn more...
Color
Click the color field to select the shadow color from the popup menu.
Blur Size
The amount of blur to be applied to the shadow (in pixels: 0 to 50) .
Offset
The distance between the screen recording and the shadow (in pixels: 0 to 300).
Angle
The angle of the shadow relative to the screen recording (in degrees: -180 to 180).
Opacity
Use the slider to set the opacity value or enter it manually (0 to 100%). When set to zero, the shadow is invisible.
Transition In
Transitions are applied to a screen recording to create a smooth progression into.
The following transitions are included: Custom, Circle Open, Circle Close, Rectangle Open, Rectangle Close, Reveal, Slide, Radial Blur, Spin Blur, Pixelate, Dissolve, Genie, Swirl, Magnify, Fisheye Lens.
Learn more...
Click the Preview button to preview the transition on the Canvas.
Click the Easing Function button to specify the rate of change of a parameter over time.
Configure the transition properties (Movement, Blur Size, Scale, Fade, Spin, etc.) using the controls displayed on the bottom of the panel.
Transition Out
Used to determine how a screen recording exits.
The following transitions are included: Custom, Circle Open, Circle Close, Rectangle Open, Rectangle Close, Wipe, Slide, Radial Blur, Spin Blur, Pixelate, Dissolve, Genie, Swirl, Magnify, Fisheye Lens.
Learn more...
Click the Preview button to preview the transition on the Canvas.
Click the Easing Function button to specify the rate of change of a parameter over time.
Configure the transition properties (Movement, Blur Size, Scale, Fade, Spin, etc.) using the controls displayed on the bottom of the panel.